
Friday, July 23, 2010
Text Effect in the Chameleon Style - Photoshop Tutorial


Fashion Wateercolor Artwork - Photoshop Tutorial
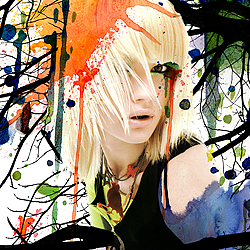
In this step-by- step tutorial I will show you how simple it is to create a dramatic fashion artwork with watercolor effects inspired by fashion illustrator, Stina Persson.
Author: Photoshop Tutorials
Go to Fashion Wateercolor Artwork
Tuesday, April 20, 2010


Monday, April 19, 2010
Make a Collage Using Mosaic Effect - PHOTOSHOP TUTORIAL
Here I’ll show you how to make a collage, using mosaic effect.
Ok, start with creating a new document sized 500×500 pixels and use the Paint Bucket Tool to fill canvas area with color of #355b00.

After that create a new layer and apply the Elliptical Marquee Tool to make a sphere selection as on a picture below, then fill this selected area with color of #97f501

Remove selection with pressing Ctrl+D and for the image jitter apply Filter > Blur > Gaussian Blur with 67 pixels of radius.

Then mess with the layer mode. I tried Overlay.

Merge two of these layers in one and start with creating mosaic. I want to try to draw mosaic flower. Let’s start! In the beginning create a new one layer and then select the Elliptical Marquee Tool to make selection like on the picture below. Fill this selection with any color you like, It doesn’t matter now.

After that create another one selection as on my screenshot what you can see below, invert it with Ctrl+Shift+I and press Delete button to clear selection.

Remove selection with Ctrl+D. We get the first petal of the mosaic. Move it in the same position as mine.

After that duplicate this layer (Layer > Duplicate Layer), then reduce it a little bit and rotate with Edit > Transform > Free Transform.

Make the petal selection using Select > Load Selection and apply Select > Modify > Expand to expand selection about 2 pixels. Move to the lower layer and press Delete to clear selection. Your result should be as mine.

Now, remove selection with Ctrl+D. Move to the upper layer again and duplicate it with Ctrl+J. After that merge all layers with petals in one layer, except topmost. Go back to it and rotate it as the layer before.

Create more petals in the same way.

Ok, after that merge all of layers with petals in one and apply Gradient Overlay and Stroke layer styles for current layer.


See the result below.

Ok, now I would like to add a couple of other colors petals to create cool mosaic effect. Create a new one leaf as was written on this lesson in the beginning. Apply color of #82a203 for this layer.

After that apply Stroke layer style to this layer.

Now, we have something like this:

Ok, then add a couple of petals more to the mosaic. Apply the same Blending Options as before to each layer.

Merge all layers with petals in one layer. After that select the Burn Tool (Brush: 100 px, Range: Midtones, Exposure: 50%) to add gradients somewhere on the flower.

Apply another one Blending Option to received layer: Outer Glow.

You can see the result below.

After that move to the next step. Press Ctrl+J to copy the layer and hide the copy (click on the eye, which indicates layer visibility). Go to lower layer and set opacity up to 18%. Go back to the hidden copy of layer and make it visible again. Press Ctrl+T to reduce this layer as was shown on my picture below.

Ok, we are almost done with this tutorial, but one more step left. Then I would like to add some floral elements. For this you can use these brushes or feel free to use your own. Go to the background layer and create a new one layer above. Create a composition like on picture shown below using Brush Tool and white color of prints. Change layer mode to Overlay and set opacity up to 40% for this layer.

After that create a new one layer more and add a couple of floral prints more in black color. Set opacity up to 25% for this layer.

Looks good, isn’t it? Hope I liked this tutorial and get adorable results. We are done for now! Good luck in your experiments!
READ MORE- Make a Collage Using Mosaic Effect - PHOTOSHOP TUTORIAL
Ok, start with creating a new document sized 500×500 pixels and use the Paint Bucket Tool to fill canvas area with color of #355b00.
After that create a new layer and apply the Elliptical Marquee Tool to make a sphere selection as on a picture below, then fill this selected area with color of #97f501
Remove selection with pressing Ctrl+D and for the image jitter apply Filter > Blur > Gaussian Blur with 67 pixels of radius.
Then mess with the layer mode. I tried Overlay.
Merge two of these layers in one and start with creating mosaic. I want to try to draw mosaic flower. Let’s start! In the beginning create a new one layer and then select the Elliptical Marquee Tool to make selection like on the picture below. Fill this selection with any color you like, It doesn’t matter now.

After that create another one selection as on my screenshot what you can see below, invert it with Ctrl+Shift+I and press Delete button to clear selection.

Remove selection with Ctrl+D. We get the first petal of the mosaic. Move it in the same position as mine.
After that duplicate this layer (Layer > Duplicate Layer), then reduce it a little bit and rotate with Edit > Transform > Free Transform.

Make the petal selection using Select > Load Selection and apply Select > Modify > Expand to expand selection about 2 pixels. Move to the lower layer and press Delete to clear selection. Your result should be as mine.

Now, remove selection with Ctrl+D. Move to the upper layer again and duplicate it with Ctrl+J. After that merge all layers with petals in one layer, except topmost. Go back to it and rotate it as the layer before.

Create more petals in the same way.

Ok, after that merge all of layers with petals in one and apply Gradient Overlay and Stroke layer styles for current layer.


See the result below.
Ok, now I would like to add a couple of other colors petals to create cool mosaic effect. Create a new one leaf as was written on this lesson in the beginning. Apply color of #82a203 for this layer.
After that apply Stroke layer style to this layer.

Now, we have something like this:
Ok, then add a couple of petals more to the mosaic. Apply the same Blending Options as before to each layer.

Merge all layers with petals in one layer. After that select the Burn Tool (Brush: 100 px, Range: Midtones, Exposure: 50%) to add gradients somewhere on the flower.

Apply another one Blending Option to received layer: Outer Glow.

You can see the result below.
After that move to the next step. Press Ctrl+J to copy the layer and hide the copy (click on the eye, which indicates layer visibility). Go to lower layer and set opacity up to 18%. Go back to the hidden copy of layer and make it visible again. Press Ctrl+T to reduce this layer as was shown on my picture below.

Ok, we are almost done with this tutorial, but one more step left. Then I would like to add some floral elements. For this you can use these brushes or feel free to use your own. Go to the background layer and create a new one layer above. Create a composition like on picture shown below using Brush Tool and white color of prints. Change layer mode to Overlay and set opacity up to 40% for this layer.

After that create a new one layer more and add a couple of floral prints more in black color. Set opacity up to 25% for this layer.

Looks good, isn’t it? Hope I liked this tutorial and get adorable results. We are done for now! Good luck in your experiments!
Saturday, April 17, 2010
MPV terbabas, terbakar: Achik Spin maut nahas ngeri

Allahyarham, yang berada di dalam kenderaan pelbagai guna (MPV) yang terbabas dan terbakar, meninggal dunia di tempat kejadian.
Pada masa ini, polis dan anggota bomba masih lagi berada di lokasi nahas dan difahamkan mayat Allahyarham akan dibawa ke Hospital Tuanku Jaafar di sini malam ini.
Pegawai Turus Trafik negeri, Asisten Supritendan Polis (ASP) Abd. Halil Abd. Hamzah mengesahkan kejadian tersebut. – Utusan
Subscribe to:
Posts (Atom)
