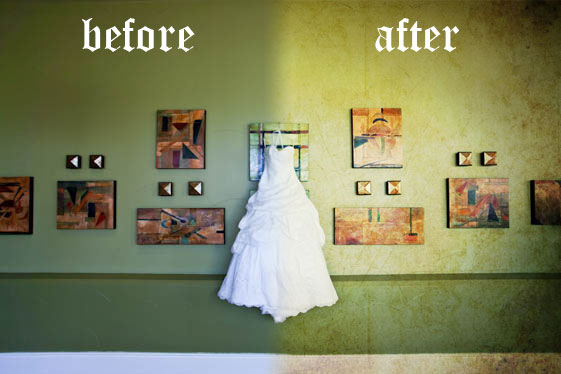
Many of you have asked us to put up an article on how to texture photos. The fact is, that there are many articles on the web that show you how to texture photos, but it is tough to find high quality articles that give you practical examples and directions that you can apply to your photography business.
This article will walk you through step-by-step on how to texture your photographs using Photoshop, and we will also give you the tools and knowledge to know how to play around and create your own unique style of texturing. So, let’s get started!
Process Your Image
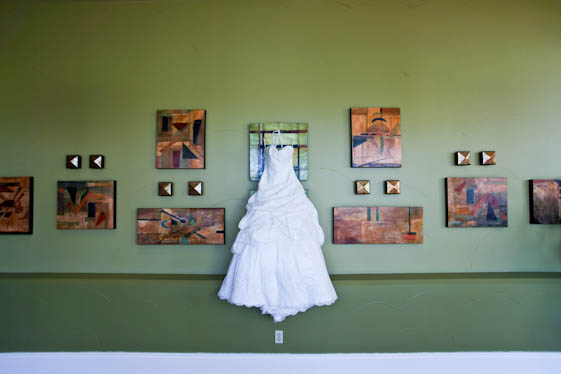
1. Select Your File - Before we get to texturing, we need to first select a file that is correctly processed. This means that you have already color corrected the image and made it look the way you want. While we use Lightroom for this process, many of you may be using Aperture, or Photoshop for your color correction.Below is our final color corrected image that we will be using for this tutorial. Don’t mind the plug, I will heal it out of the final image.
Applying The Texture
2. Load the File – First, start by loading your image into Photoshop and make sure you are editing in 8bit RGB mode. To change the image mode, from the menu simply select Image –> Mode –> RGB and 8Bit Channel.
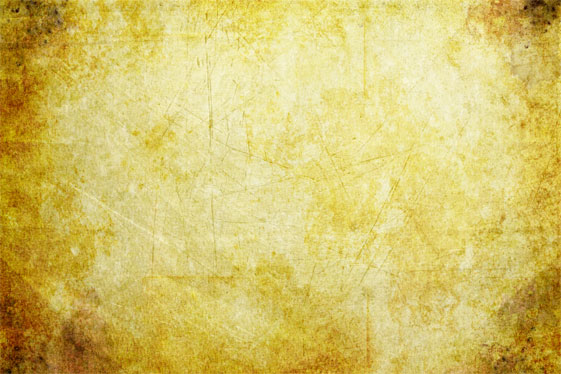
3. Import The Texture – Place your first texture file (File –> Place –> Choose Texture File). Make sure that your texture files are in a printable resolution that matches or is close to your image resolution. Otherwise, you will need to stretch your texture to your image size which will reduce its print quality significantly. For this tutorial, I am going to use one of my favorite bread-and-butter scratch textures as seen below. As a little bonus, promise to share or help promote SLR Lounge and you can download the full resolution texture by clicking here, or on the image below.
Note - The image below is print resolution and is 11.2MB in size, so depending on your connection, it may take a while to download.
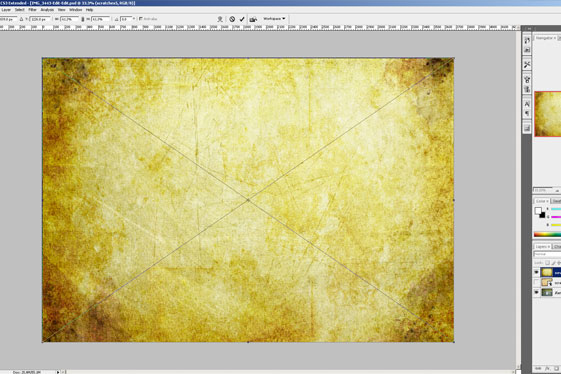
4. Resize The Texture – Once the file is placed, resize the file if needed to cover your image as shown in the image below. Once the file is placed and sized, you can hit enter so that it places the file in a new layer of its own.
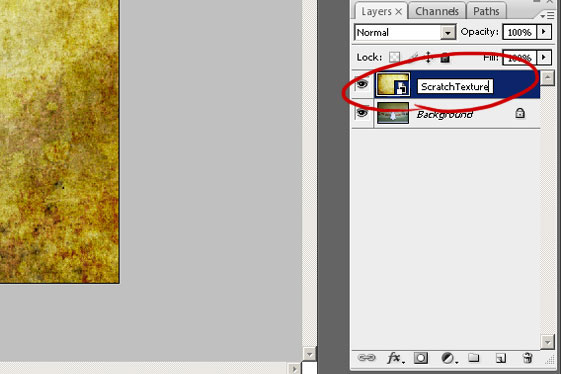
5. Name the Texture Layer – Often times, I use more than one texture layer in an image. Thus, naming each layer is helpful so I know which layer I am editing. To edit the image name, simply double click on the name in the Layers palette, type the new name in (in our case “ScratchTexture”), and hit enter as shown below.
6. Changing the Blend Modes – You now should have two layers in your file, your texture layer and background image layer. However, currently we cannot see the background image layer as the texture layer is fully opaque. So, what we need to do is change the blend mode which is found on the pull down menu right below the layers tab as shown below. The blend mode listing is actually separated into different types of effects. Changing the blend mode of a layer will basically affect how that layer’s pixels interact with the layer(s) beneath it. Below is a brief explanation of the three most common and practical blend mode sets.
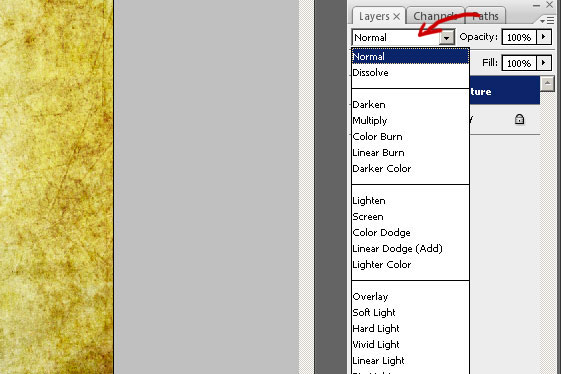
i. The first set of modes beginning with “Darken” are all Darken Modes that will darken the layer(s) beneath the blend layer in different ways.
ii. The second set of modes beginning with “Lighten” are all Lighten Modes that will lighten the layer(s) beneath the blend layer in different ways.
iii. The third set of modes beginning with “Overlay” are Contrast Modes that will both darken and lighten aspects of the image. Typically resulting in mixing the blend layers colors with the layers below.
7. My Favorite Blend Modes – My favorite blend modes are the Overlay and Lighten blend modes. This means that while I do often use other blend modes, the Overlay and Lighten blend modes are two modes that are difficult to use incorrectly.
8. Applying the Overlay – For our image, I am going to use the Overlay blend mode. So I have selected it in the blend mode drop down list. You should now have an image like the one below.
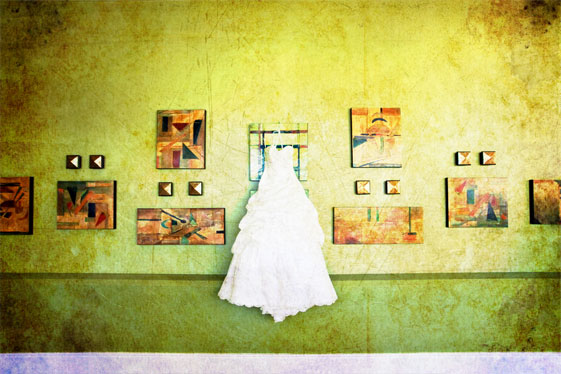
9. Adjusting the Opacity – Now, while our ScratchTexture image is blending with the image below, it is much too strong at the moment. So I am going to adjust the Opacity of the texture layer to 65% to lighten the effect a bit as shown below.
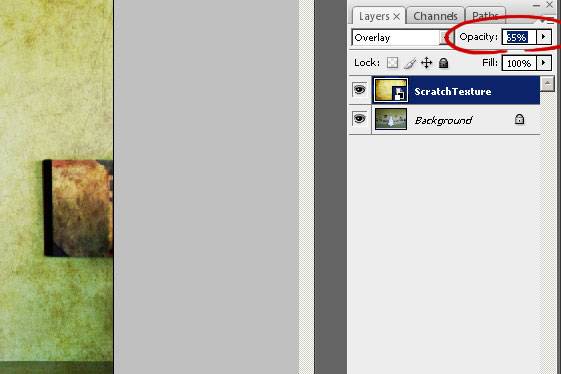
10. Rasterizing the Texture Layer – If you notice in the image above, the icon next to the texture layer’s name has a little Smart Object paper symbol inside of the image thumbnail. This means that the file is not directly editable in Photoshop because it is linking an outside file to save on space. However, we need to be able to edit our texture layer, so we need to rasterize the layer. To do so, right click the layer and select Rasterize Layer. Once rasterized, the Smart Object icon should disappear.
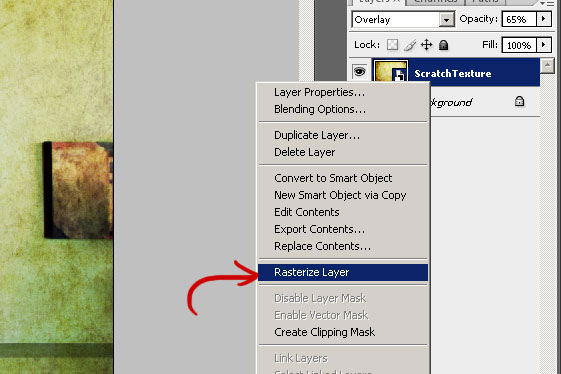
11. Removing Areas of Unwanted Texture – Many of you may have images where you don’t want the texture to cover certain parts of the image. For example, you typically don’t want textures to cover skin as it will turn your subjects into 500 year old statues which they may not appreciate.
Those of you that are familiar with Photoshop might think it would be best to create a layer mask and paint out the areas where you don’t want the texture to show. However, you would be wrong in doing so. Why? Because our texture layer not only applies texturing to the layers below it, but it also changes the tones and hues of any layers below it. So, if you were to mask out part of the texture, that area would have a tone/hue that doesn’t match the rest of the image as illustrated below.
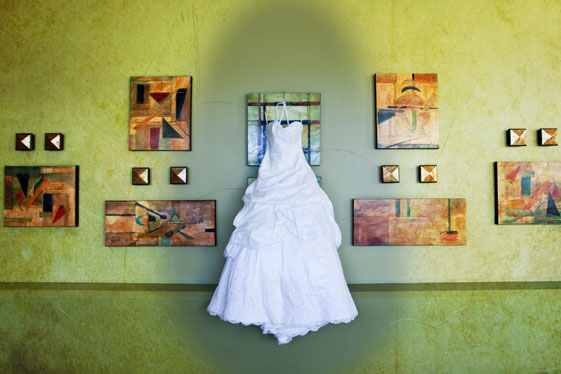
As you can see in the image above, the areas that have been Masked out show a completely different hue and tonal quality as the areas underneath the ScratchTexture texture layer.
So, rather than masking out the texture layer, I am going to give you two options which will remove the texture but retain the tone of the area. Both of which require the texture layer to be editable, which is why we rasterized the layer in Step 10 above.
12. Removing Unwanted Texture with the Smudge Tool – Removing the texture with the Smudge Tool (“R”) gives you a little more control over how much texture stays in a certain area. However, it is my least favorite method because of two reason: The first is that the Smudge Tool is very demanding of your computer’s processing power. In fact, when dealing with large resolution files, it may be nigh impossible as your computer can constantly freeze as it is trying to process the command.
The second reason is that it takes time to get it to look the way you like. Nevertheless, I will teach you both methods so you can decide which you prefer on your own. Select the Smudge Tool (“R”) which looks like the pointed finger as shown in the image below.
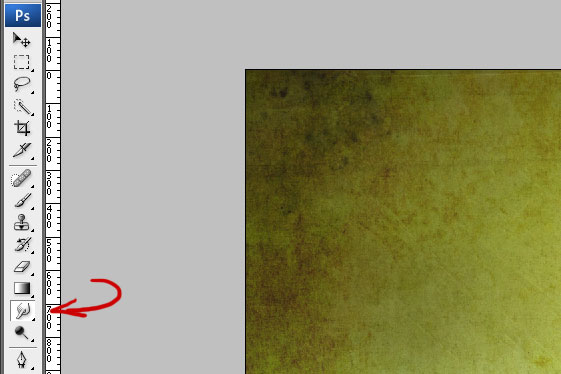
Now, on the texture layer (ScratchTexture in our case), smudge away the area where you don’t want the texture to be. You can increase/decrease your smudge brush size by clicking ] and [ respectively.
13. Removing Unwanted Texture by Averaging – Removing the texture by Averaging removes all control over how much texture detail you retain in an area. However, it is quick and easy on your processor making it my preferred method. Averaging will simply take a selected area of pixels, and average all the colors in that area. Doing so will make our image retain its tone, but lose the texture in averaged areas.
i. To start, select your image layer and using your preferred tool, select the area that you don’t want affected by the texture. I am going to use the Quick Selection Tool (“W”) and select the dress as shown below.
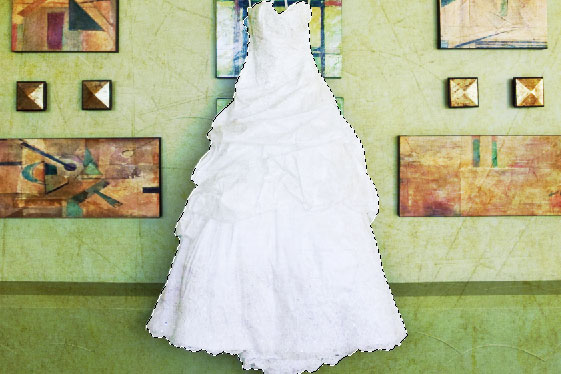
ii. Next, select your texture layer once again (ScratchTexture in our case). Now, the selection area of the dress (or whatever you are selecting) should still be selected. Now, click Filter –> Blur –> Average and viola! The texture is removed over your selected area as shown below.
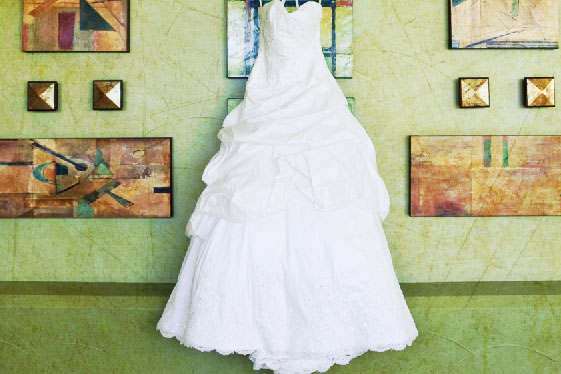
iii. To see exactly what the Average function did to your layer, hold Alt and click on the eye icon next to your texture layer to see just that layer and this is what you should see. You can see that our selection area has been averaged to a single color.
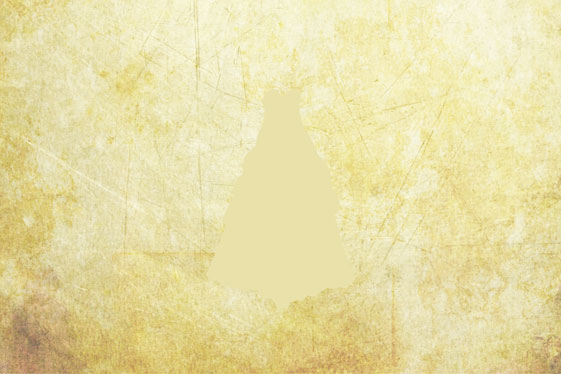
Thus, we have retained our tone, but removed all of the texture detail. Hold Alt and click on the eye icon to bring all layers back into view.
Adding Your Finishing Touches
As I mentioned earlier, I want this image to have a vintage look. We have done the difficult part, but we are not quite done yet. Here is what I am going to do to the image from here.1. Adding a Vignette – I want to add a strong vintage vignette to the image to not only make the image feel more warn, but to also bring focus into the center of the image. I am going to do so by clicking Filter –> Distort –> Lens Correction and applying a Vignette with the following settings.
Amount: -85
Midpoint: +19
2. Adding Warmth – I like the warm look of vintage images. So I am going to add a Curves adjustment layer by clicking the half black/half white circle at the bottom of the Layers palette as shown below.
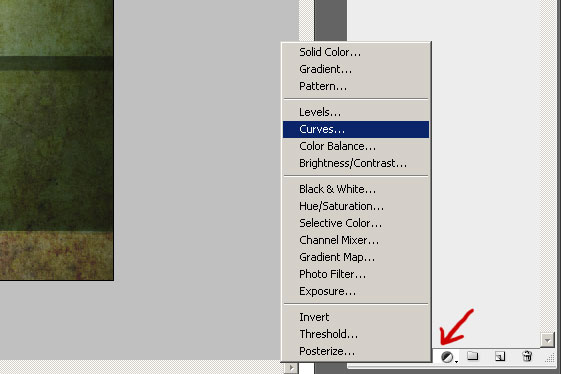
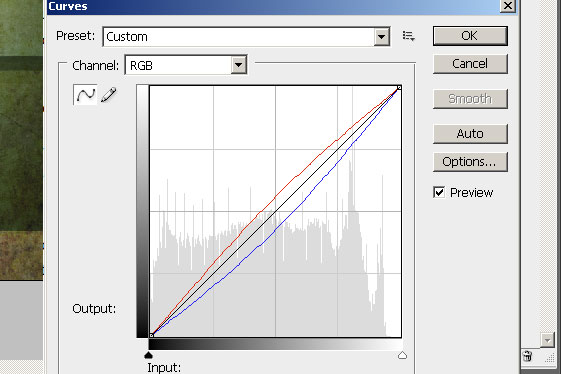
i. To add warmth, simply increase the reds while decreasing the blues. You can keep the greens the same. Here is what my Curves looks like after my adjustment.
3. Desaturate the Image – Next, I want the colors to be a little less vibrant, so similarly I am going to add a Hue/Saturation layer adjustment by clicking the same menu as we did to add our warming Curves shown in step 2 above. I am then going to adjust the saturation to around -20 to -30. Nice, I like the final image and I am going to call it good! You can see our before and final after image below.
Here is our before

Here is our final image after our Photoshop texturing tutorial
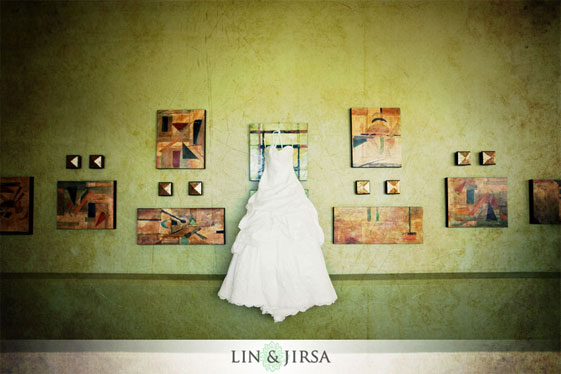
Enjoy Your Handy Work!
While I wanted to give you a concrete tutorial to work with, keep in mind that this is all preference and very subjective. Play with your settings, try different blend modes, adjustment layers, etc. This tutorial should have given you all the knowledge you need to go out there and start developing a style of your own!If you guys have any other comments, resources, ideas, etc, share them below in the comments section.
By: Lin and Jirsa Wedding Photography, Los Angeles and Orange County Wedding Photographers
_______________________________________________________________________________
0 comments:
Post a Comment